Wednesday, March 27, 2013

WeldrBrat's Oatmeal Cookies


Everybody has their own version.  Right?!

I know!

But nothing gives me greater pleasure than sneaking a really great vitamin source into a snack – especially, when it’s some type of food that most people just never seem to pick up eating by itself.

And I smile really, really BIG - at those falling in love with these cookies while they’re eating them – knowing full well they’d be one of that “ Ewwwwww! “ crowd!

You know… the ones that don’t like Broccoli.

Noooooo… I did not!

" Come see! "

WeldrBrat’s Oatmeal Cookies

Makes a Double-Batch… approximately 8 dozen cookies.

Ingredients:
2 sticks Unsalted Butter **
1 ½ c. firmly packed Brown Sugar
1 c. Sugar
4 Eggs
2 tsp. Vanilla
3 c. All-Purpose Flour
2 tsp. Baking Soda
2 tsp. Cinnamon
½ tsp. Salt ( or not )
6 c. Old-fashioned Oats ( uncooked )
1 c. Dried Cranberries
1 ½ c. Dried Cherries ( chopped )

Directions:
Set out 2 sticks of Butter to come to Room Temperature.  ** I have found that ( and I don’t know why ) taking 2 sticks of butter from the freezer to bring to room temperature makes a huge difference in the texture of this cookie.

Once your Butter has come to a firmness without a chill – turn your oven on to 350*.  Begin your preparation.

In a Medium-Size Bowl:
Combine FlourBaking SodaCinnamon and Salt with a wisk.  Set aside.

In a Large Mixing Bowl:
Combine Butter and Sugars, until you have a nice meld that looks almost like a doughy paste.

Add Eggs and Vanilla.  Mix thoroughly, just enough to get an even blend.

Add Flour mixture.  I do this in 3 portions to keep a white mess from spreading all over my kitchen!  Start on the lowest speed and increase to second speed to get each portion completely incorporated.

Add Dried Cranberries and Dried Cherries.  Mix thoroughly.

Final step… CAREFULLY add Oatmeal.  My KitchenAid tends to try sending the batter over the edge.  So, don’t walk away!  I turn the machine off a couple times – to scoop all the batter back down into the center of the bowl for better mixing.

Do NOT be tempted to turn up the speed on your mixer to get better mixing.

Trust me.  Just – don’t do it.

Dob hefty Teaspoonfuls ( a little smaller than a golf ball ) onto cookie sheets.  Bake for approximately 13 minutes.  All ovens vary.  So, check!  Pull no later than when you see a brown crust developing around edges of cookies.

Leave cookies to set on cookie sheet while you set up another batch on a second cookie sheet.  Once you put the second sheet of cookies into the oven…

Pull cookies off with spatula and set onto waxed paper to cool further.

If you can manage to let ‘em get that far, anyway!  Ha!


Thursday, January 12, 2012

Holiday Leftover Roll of Sweet Sin


The period of time following the Christmas Holidays makes for a perfect example as to when it’s a perfect time for having some Grown-Up fun getting messy with this recipe!

Alright - so it’s really just a perfect - excuse.

However - if you’re over the age of 41 years - why do you need an excuse for anything?

I prefer to consider this as being no different than cleaning my refrigerator - thank you very much.

Okay.  Now that we have the philosophy of life squared away…

Cleaning up your Holiday Baking Leftovers - simply relies upon - Chocolate Chips!

Oh - and waxed paper.


I took what I had in my kitchen - and put all this together.  Now from the get-go I will tell you - there is almost total freedom to pour and sprinkle as you choose!  There is no exact measuring.

Yet - you can count on not using all the prepared ingredients. But - that just gives you reason to go get another large back of Chocolate Chips!  Unless you sit there and munch ‘em all down while you’re totally lost in some other subconscious past life - totally unaware of what you’re doing.  If you’ve got help with that - such as the pups or the kids - that just makes it a party!

This is all about - fun!  There are no exact ingredients - beyond a Large Bag 23oz. Bag of Milk Chocolate Chips.  However - this IS NOT a recipe for Diabetics.  Sorry.

Let’s Begin!


Smear Unsalted Butter over an entire sheet of Waxed Paper covering a Large Cookie Sheet.

Hubs does not like Coconut.  I LOVE Coconut.  Rarely do I get a chance to have anything with Coconut.  I made this one of those opportunities!  There was a compromise - sprinkling a layer of Coconut on only half the waxed paper.


One box of Candy Canes that I’d rigged around a red Pillar Candle for Christmas decorating.

Peeled the cellophane off each cane and placed them into a gallon-size Ziploc bag.  Pay attention.  Carefully - and softly - crush the canes with a hammer.


Try to keep them spread out and not stacked on another - crushing them until they look about like this.


Despite being careful - be prepared.  You’ll find this under the bag.  So - don’t even lift the bag up until you’re ready for ‘em.


In a medium-size bowl - I chunked some pretzel sticks ( about 2 handfuls ) to about 1-inch size.


Most people use those dried or candied cherries in their baking.  I used these!  I drained the juice into a bowl.


Poured the juice back into the jar - and stuck it in the refrigerator. You never wanna throw this juice out!  I pour a little bit of this into my glass of Dr. Pepper!  Works in a Coke, too!


The cherries were sliced into quarters.

Here’s where it all becomes about layers.


Sprinkled a layer of the broken Pretzel Sticks.


Sprinkled a layer of the crushed Candy Canes.


Sprinkled ALL the quartered Cherries.


Now - I do not have a double-boiler.  Who needs one when you have a 3qt. Saucepan and a set of those treasures called Pyrex Mixing Bowls?!

I put about 1-inch of water in the saucepan.  As long as the bowl can rest on the saucepan without touching the water - you’re good to go!

Get the water to a boiling stage.  Turn it down to a low-medium heat. Add your Chocolate Chips to the bowl and stay with them - stirring until they’re all melted enough that you can almost pour them out of the bowl.


Gets messy here.  Smear the melted chocolate over the whole sheet - as much as you can - as quickly as you can.

Yes - you’re gonna pick stuff up.  Yes - you’re gonna get chocolate on your hands.  Just fight with it - and Git ‘er Done!


Mini Marshmallows become the final layer.


Carefully - bring both long sides of the waxed paper up to meet each other.

Gently - squish the mess into a tube - doing all you can to keep from tearing the waxed paper.


(Can you tell which end has the Coconut? )
Slowly twist the ends of the waxed paper - and tuck them under the Roll of Pure Sin!

Stick that puppy in the Refrigerator to set - for about an hour.

I saw this as soon as I closed the door on the fridge.


I did my best to keep from wasting one single chocolate chip.  Truly!

Once the roll has had time to set…

Slowly - Gently - Carefully - pull the waxed paper off the roll.


Cut it into slices with a large chopping knife.

You can go nuts with trying so many other ingredients.  But remember one rule of thumb…

Never use too many ingredients.  You have to keep the layers down to a number safe enough to allow for being able to roll the whole mess into a log - without tearing the waxed paper.

As for using plastic wrap… save your sanity.

Trust me.  Trying to use that stuff with this recipe will destroy your earned pleasure of jumping into a slice of this Certified Diet Killer!

Wednesday, June 2, 2010

Teresa's Buried Boobs!


( All the other photos are at the end of this posting.  Click on photos for larger view.  Hit your Browser's Back Button to get back here! )

Normally - I am one to refuse baking any main dish that includes pasta - these days.  I dunno.  They seem to have cheated on ingredients with every domestic brand of pasta you find in the grocery stores - enough that the texture becomes mushy - and turns my gut.  If you attempt to add it into the dish uncooked - it usually comes out crispy in ways that can break a horse’s teeth.


( All the Ingredients you'll need for this recipe. )

And then - God blesses me!  My eyes land on Calovita Pasta - and those little Fettuccine “ Nests intrigue me enough to take some home to try.  Okay - the fact that the address on the package is located in Italy didn’t exactly dance with my skeptic senses.  Anyway - my first impression was such an “ Ahaaaa ! “ moment with my Spaghetti that I won’t buy any other brand of Fettuccine - any longer!

The texture of this noodle - even after being thrown into the oven after being boiled - reminded me of my Mother’s Tuna Casserole that she made when I was very little.  I can still remember the texture of that noodle.  And after all these years - finally!  I’ve enjoyed a wonderful reunion!  I think everybody knows - the secret to liking Tuna Casserole has everything to do with the texture of the pasta!

This dish I'm sharing here turned out to be a concoction of ingredients that my whole body seemed to be craving - for over a week.  Let’s face it - Chicken breasts can bring about some fairly interesting *cough* conversations - when combined with enough testosterone - beer - and more than one male in the room.  Hence my choice for naming this concoction.  Let’s just get that over with and move on - so we can chow down, Guys!

And “ chow down “ is exactly what my husband did last night.  I have never seen him enjoy eating anything I’ve ever cooked for dinner - anywhere near as much!  It was almost comical.  I’m not sure he realized the noises he began making along the way.  And in between - several times I was being told - “ This is really good, Baby. “

And he was drinking sweet tea!

Okay - here goes!  Here’s the list of all that you’ll need for the entire dish!


Teresa's Buried Boobs

Ingredients -
2 - 4 Chicken Breasts
Course Ground Pepper
Fettuccine Pasta ( cooked al-dente )
2 TBL. Olive Oil
16 oz. Canned Tomatoes
White Sauce w/Herbs (  recipe/Instructions below )
¾ lb. shredded Mozzarella Cheese ( approx. 2 ¾ c. )
1 pkg. Baby Portabella Mushrooms

White Sauce with Herbs
Ingredients -
1 stick unsalted Butter
1 TBL Sea Salt
¼ c. plus 2 TBL. Flour
1 TBL. Chopped fresh Garlic ( approx. 5 good-size cloves )
Pinch of Crushed Red Pepper
1 c. Chicken Broth
1 ½ c. Pet Milk ( large can )
3 sprigs fresh Basil ( approx. ¾ c. )
4 sprigs fresh Greek Oregano ( approx. 1/3 c. )
1 handful fresh chives ( approx. ½ c. )

Let’s get to burying these Boobs!
1.  Make sure chicken breasts are completely thawed out.
2.  Pinch leaves off Basil.  Stack with largest on the bottom.  Beginning from the end of the largest leaf - roll the bunch of leaves up to the top of the leaves ( like a burrito ).  Cut into thin strips from one end to another.  Place in a bowl ( same size as for eating cereal ).
3.  Strip leaves off Greek Oregano.  Mince with a knife.  Place into bowl with Basil.
5.  Chop Chives same as you would for a baked potato.  Place into bowl with the other two herbs.
6.  Pre-heat oven to 375*.
7.  Wash chicken breasts under cold water and set into your - 2” deep minimum - baking dish.  Sprinkle with course ground black pepper and sea salt.
8.  Bake in pre-heated oven - without lid or foil covering - for 45 minutes.

While you’re baking the boobs - prepare the White Sauce with herbs - pasta - and the mushrooms.
1.  Fill a 3 qt. almost 2/3 of the way with water.  Add Olive Oil.  Speed the process of bringing the water to a boil by placing a lid over the saucepan.  Place pasta into boiling water.  You’ll need to watch the pasta.  Cook until al-dente ( approximately 10 minutes ).  Drain and rinse with cold water.  Keep it in the saucepan with the lid over the top until ready for use.  I usually drizzle a little more olive oil over the pasta and stir it in.  Keeps the pasta from sticking.
2.  Melt stick of butter in 3 qt. saucepan on Medium Heat (very important) .  Add 1 TBL. Sea Salt - Garlic - and pinch of Crushed Red Pepper.  Stir and let meld for about 1 minute.
3.  Using a Whisk - add flour.  Whisk until smooth.  Add Pet Milk and Chicken broth.  Whisk until smooth.
4.  Cook mixture on medium heat - constantly stirring with Whisk for about 20 minutes - or until as thick as cream of mushroom soup.
5.  Once you see a thick wall of sauce trying to remain on the sides of the saucepan - remove from burner.  Don’t forget to turn the burner off !
6.  Add herbs into mixture.  Stir into mixture.
7.  Pull stems off mushrooms.  Clean mushroom buttons with damp paper towel.
8.  Grate the Mozzarella Cheese! ( Set it back in the fridge until the chicken comes out of the oven ! )
Once the Boobs have baked for 45 minutes - remove them from the oven and set on a hot pad in your work area.
1.  See the drippings in the pan?  With a basting brush - brush the drippings up the sides of the pan.  Use a folded paper towel if you don’t have a basting brush.  Do not discard excess drippings.
2.  Distribute mushroom buttons over entire pan.  Follow with pasta.
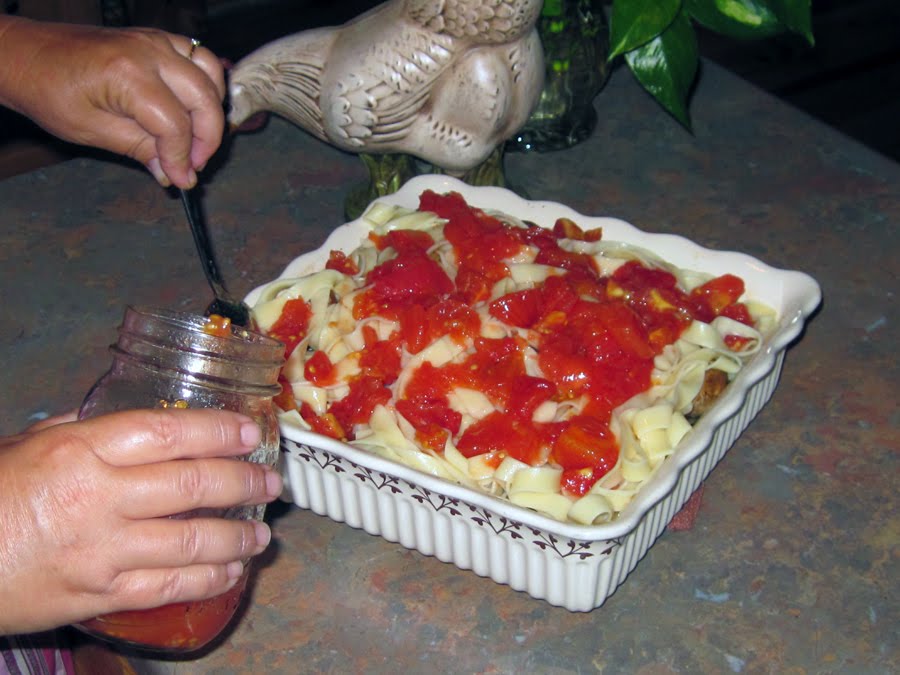
3.  Without straining canned tomatoes - spoon entire contents over chicken - mushrooms - and pasta.
4.  Very carefully - begin distributing White Sauce with Herbs over entire dish.  You will need to do this in intervals - allowing the sauce time to fall down into the other ingredients.  You may even want to lift a side of each breast with a fork to allow the mixture room to fall in.
5.  Once all the White sauce is distributed across the entire dish - place back into the oven for 35 minutes.
6.  After 35 minutes - remove the pan from the oven.  Distribute the shredded Mozzarella cheese.
7.  Place back into the oven for another 10 minutes.
8.  After removing from the oven - allow to sit for 10 more minutes.
9.  Use a sharp knife to cut sections into the cheese.
10.  Find your chicken breasts with tongs ( or a fork ) and remove chicken breast from pan to plate.
11.  With a large serving spoon - dish out all the other goodies onto your plate!

Yes - things may look a little “ watery “ in the pan - at first.  Don’t worry.  That’s what allows your chicken breast to cook up nicely moist and tender!

I will tell you this much.  Being able to add fresh herbs and your own home-grown and home-canned tomatoes makes such a huge difference in the taste of this dish!!

If you haven’t done so yet - get out there and learn how to grow your own herbs and tomatoes!

Okay now - the fun part - Photos for visual support below!


After baking in oven for 45 minutes.


 Place Mushroom buttons into pan.


Spread the cooked Pasta.


Spoon canned tomatoes over Pasta.


Spread White Sauce with Herbs over entire dish - slowly - in intervals - allowing sauce to move down into the dish.  Place back into the oven and bake for 35 minutes.


Remove from oven and distribute shredded Mozzarella cheese.  Place back into oven for another 10 minutes.


Buried Boobs!  Wait 10 more minutes after removing them from the oven for the last time - before slicing cheese into sections with a sharp knife.  Using tongs or a fork - go in and pull a breast out and place onto a plate.  Spoon all the other good stuff out onto the plate.

Wednesday, March 31, 2010

Country-Style Ribs on The Pit !

Anyone raised in Texas knows that one of the most important elements in life to learn is - Bar-b-Que.  And it’s a serious subject.

A Texas marinade usually has what they call - a savory flavor.  We’re just really not into adding all the sweetness in the far south.  " Don’t need anymore than we’re already born with ! "

Some folks seem to bury the taste under all the Cayenne pepper.  I’ve never understood that one.  I prefer being allowed to taste the meat.

Some folks are under some - desperately confused notion - that you should boil your meat before putting it on the pit.  Boiling all the flavor out of a meat?  This just brings another addition to the definition of the word - crazy.

I mean - why bother with all the hassle.  Just grab a can of potted meat!  It’s already ruined.

Boiling the meat removes the fat ! “  Really?  Honey - if you’re gonna buy into all the hype with nutritional rules that they’re all putting out there - don’t bother!

And on the side - let me give you a clue about all that hype.  There aren’t enough jobs in this country.

Knaw on that one for a while!

All you others - let’s just move on to the good stuff!


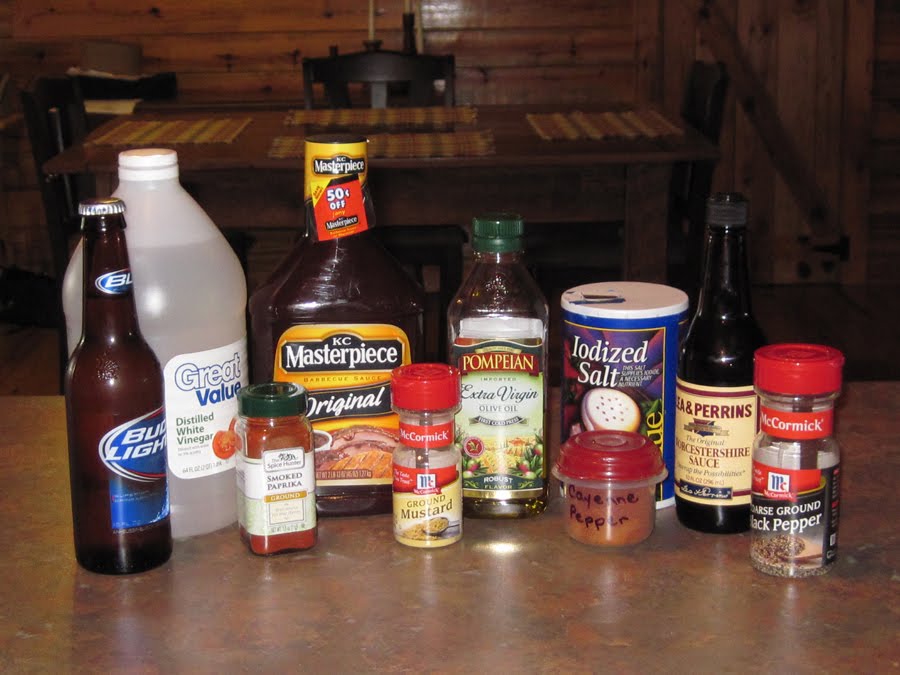
These are the ingredients you’ll need.

As you can tell - there are times when I will choose store brands.  There are very few times in this world when I will insist on the product being carried under a major brand - especially during these days.  If everybody took the time to pay attention to prices when they do their grocery shopping - all those major brands would have to submit to those that secure their paychecks for them - you and me!

Country Pork Rib Marinade

1 tsp. dry mustard
1/4 tsp. course ground black pepper
Pinch of Cayenne ( can be adjusted to your liking )
1 Tbl. paprika
1 tsp. salt
1 Tbl. Worcestershire sauce
1/2 c. K.C. Masterpiece " Original " BBQ Sauce
1/2 c. distilled vinegar
1/2 c. extra virgin olive oil
1 ( 12oz. ) Beer ( Your choice ! )


I've used a #3 Rubbermaid bowl.  This is a little over 3lbs. of ribs in the marinade.

Mix all ingredients together.  Soak ribs in marinade in the refrigerator for minimum of 4 hours.


Here’s the Finished Product!

Believe it or not - I almost forgot to get this shot!  These were the last two left over - after Hubby and I had already eaten!

Once the ribs were put onto the smoker - I went back and mopped them with the marinade each time I turned them.  And yes - I turn my meat to cook twice on each side - with the exception of steak.  And I never put the final dash of salt on my meat until I give it the last turn and baste.

Tuesday, February 2, 2010

Calamari Success!!


I’m so surprised by how many people I know that - still - haven’t been able to jump off that cliff to try Calamari.

Even more surprising is to know that some of those same folks can suck down raw oysters and chase ‘em with beer - but - carry this heavy fear of - Calamari.

Confession here.  I have never been walked through that dark fear of raw oysters.  I will kill you over fried oysters!  But - I can't even handle the sight of watching someone doing raw oysters.  How do you consider what you don't chew as eating - anyway?

In case you don’t know - Calamari is the dress-up name for a wonderful appetizer prepared using - Squid!

And I love it - absolutely!

Nine times out of ten - I have learned that the first experience is downright crucial to success with walking any loved one into a whole new food world for their pleasure.

For me - it was a Christmas dinner in a little bitty small room - some very quaint Mom ‘n Pop place in Turlock, Calfifornia.  For some reason - I can’t even remember the name of the place.  It's been so long ago.  I can only remember the room - and the company at the table.  I dunno.  But I think that gives more value to the memory and the reason why we were there - rather than only remembering the name of the place - so there!

I have tried - for quite a while - years - to get Dwayne to taste Calamari.  Attempts to walk this husband of mine to the other side of that dark fear - Ha! - much like walking some Great Pyraneese - that decides to take a nap - in a mud puddle.

It hasn’t been pretty.

But - let me go on record.  There was success - finally - on Monday, February 2, 2010 - at my most favorite restaurant - Johnny Carino's in Knoxville, Tennessee!


I don’t know why - but - almost everywhere I have been since my first taste of Calamari - I have found it being served with Marinara sauce.  Maybe some people can handle this - but for me - that spicy tomato Marinara just doesn’t fit with - seafood.

When all else fails - try it with Ranch Dressing!

Well - not this time.  But close!

Try this Side Dip!

Teresa's Favorite Calamari Dip

Ingredients:
1 8-oz. pkg. Cream Cheese
1 16-oz. carton Sour Cream
2 Tbl. Prepared Horseradish
1 tsp. Lemon Juice
Salt to taste

Instructions:
Let your cream cheese sit until room temperature.  Strain prepared horseradish - unless you use fresh grated.  Combine all ingredients.  Best if you let it set in the refrigerator for thirty minutes or so.


Side Notes -
The very best recipe I have ever found for preparing Calamari at home is one offered by my one of my two favorite Manly Chefs - Mario Batali !!


Saturday, December 26, 2009

Holiday Mashed Butternut Squash

I planted one mound of Butternut squash in our garden for 2009.  I left only three plants to remain on the mound for growing.


This is what we ended up with - on only the first picking!


The best place for storing squash is down in your basement.  This particular squash tends to become more flavorful if left down in the basement for a few months.  I waited three months before peeling the first squash.

As you can see - I had a lot of squash to put up for the winter - even after sharing with others!  I spent two days peeling squash - chopping - boiling - mashing - measuring and stuffing into FoodSaver bags - before hauling them down to the freezer!

Holiday Mashed Butternut Squash

Ingredients:
3 cups Butternut Squash ( I’d say 1 good-size squash )
6 Tbl. Butter or Margarine ( the whole stick, if you must! )
2 Tbl. Light Brown Sugar
¼ cup Eggnog
¾ cup Toasted Chopped Pecans (chopped)
Just a Pinch of Cinnamon
¼ tsp. salt (optional - or more - depending on your own preferences)

Instructions:
Trust me.  Skipping excess clean-up is so worth the effort to peel the squash!

Peel the squash with a potato peeler.  Slice into 1-inch chunks ( as much as possible ) and boil in water - just as you do for mashed white potatoes.

Squash is ready when you can pierce it with a fork.  Drain and mash ( in the same pan ) just as you do for white mashed potatoes.

Return mashed squash to stove.  On medium heat - add all the other ingredients.  Stir occasionally - make sure it doesn’t begin to stick to the bottom of the pan.

And stop dipping that spoon from the pot to your lips!

Squash is ready when it’s completely melted - melded - nice and hot!